Deploy Worker Roles on Azure Version 1.6
发布于 2015-09-14 15:27:03 | 223 次阅读 | 评论: 0 | 来源: 网络整理
The screenshots in this article refer to the older (pre-June 2012) Windows Azure portal, but the functionality is the same.
Deploy in a Development Environment
The solution can be built and run in a development environment using the Azure emulators as is using Visual Studio 2010 (if adequate disk space is available). Since this solution uses Cloud Drive you cannot run from a development environment against Azure cloud storage. Instead, when you run in your development environment it uses development storage:
The MongoDB log file is located at:
C:Users<user>AppDataLocaldftmpResources<deploymentid>directoryMongodLogDir
On a development environment the port that mongod listens on would be configured port (27017 by default) + instance id.
The MongoDB data files are at:
C:Users<user>AppDataLocaldftmpwadddevstoreaccount1mongoddatadrive(replica set name)mongoddblob(instance id).vhddata
Additionally when the app is running you should be able to access the drives on mounting as you would access any mounted drive.
Deploy in the Azure Environment
Login to the Azure management portal using your Azure credentials.
Azure Setup (First Time Only Per Deployment)
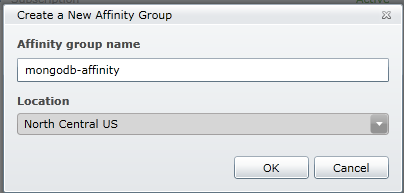
Create an affinity group for your deployment. Choose your required location for the group.
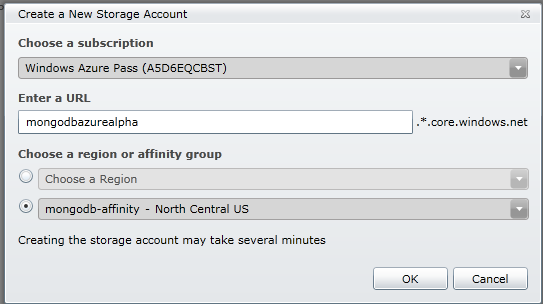
Create the required number of storage accounts to store the blobs. For region/affinity choose the affinity group you created earlier. Note The access key for the storage account created is the one you need to specify in your cloud configuration.
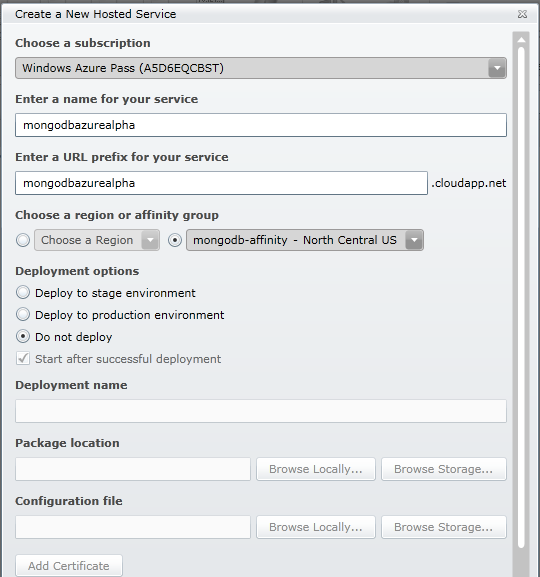
Create a new hosted service to host your MongoDB package. For region/affinity group, use the same affinity group as your storage account. For cloud drives the compute and storage instances should be in the same azure domain. Choose do not deploy.
Deployment Configuration for MongoDB.WindowsAzure.Sample.MvcMovie Web Role
If deploying the sample application, you can use the default settings as is. You would only need to set the storage settings for diagnostics.
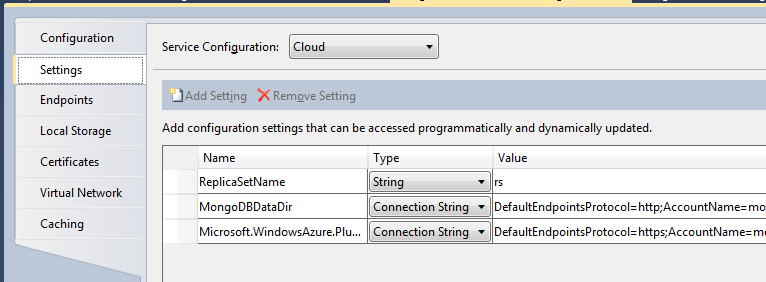
In the Settings tab, set the following:
ReplicaSetName: This should be the same as the replica set name specified in the MongoDB.WindowsAzure.MongoDBRole.
Microsoft.WindowsAzure.Plugins.Diagnostics.ConnectionString: Specify your Azure storage credentials. Ensure that the connection mode is https.

Deployment Configuration for MongoDB.WindowsAzure.Manager Web Role
To deploy the manager application you can use the default settings as is. You would only need to set the storage settings for diagnostics and mongodb data directory.
In the Settings tab, set the following:
ReplicaSetName: This should be the same as the replica set name specified in the MongoDB.WindowsAzure.MongoDBRole.
MongoDBDataDir: Ensure that connection mode is http.
Microsoft.WindowsAzure.Plugins.Diagnostics.ConnectionString: Specify your Azure storage credentials. Ensure that the connection mode is https.
Deployment Configuration for MongoDB.WindowsAzure.MongoDBRole Worker Role
In the Configuration tab:
- Ensure the VM size for ReplicaSetRole is at least Medium. Larger instance sizes provide more RAM and also greater bandwidth. For more information on instance sizes, see <http://msdn.microsoft.com/en-us/library/windowsazure/ee814754.aspx>.
- Set the Instance Count equivalent to the required number of replica set members. The default is 3.
In the Settings tab, edit connection settings to use actual storage account credentials (created earlier). It is recommended to use different storage accounts for data and diagnostics. This would allow you to give access to external monitors for diagnostics information without giving access to your data. Set the following:
- MongoDBDataDir``: Ensure that connection mode is http.
- ReplicaSetName: This is the name of the replica set in the replica set configuration. This is also the suffix to the blob container created in your storage account. This needs to be the same as the replica set name in the client applications.
- MongoDBDataDirSize: Maximum size of your cloud drive where mongod data files are stored. Currently the maximum size can be 1TB.
- MongoDBLogVerbosity: Verbosity for mongod logging. Default is null.
- RecycleOnExit: This dictates whether the worker role is recycled when MongoDB exits. Default is false.
- Microsoft.WindowsAzure.Plugins.Diagnostics.ConnectionString: Ensure that the connection mode is https.

- ..note:: If deploying multiple Azure instances make sure you use
different storage accounts for each of the deployments or different replica set names if using the same storage account.
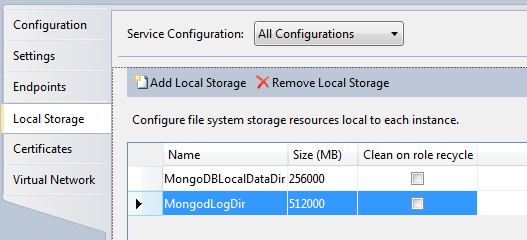
In the Local Storage tab, configure the amount of local storage required depending on the VM size chosen. Ensure Clean on role recycle is unchecked. The following are recommendations:
VM Size
MongoDBLocalDataDir
MongodLogDir
Medium
256000 (250 GB)
51200 (50GB)
Large
768000 (750 GB)
51200 (50GB)
Extra Large
1024000 (1000GB)
51200 (50GB)
Create the Azure package:
Right-click on the cloud project and selecting Package. Select the following:
- Service configuration: Cloud
- Build configuration: Release
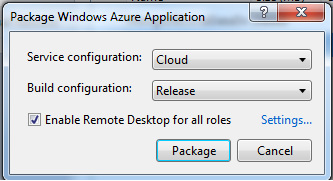
If required, enable remote desktop on the role instances. See <http://msdn.microsoft.com/en-us/library/gg443832.aspx>.
Deploy the created package from the Azure management portal. More details on deploying can be found at http://msdn.microsoft.com/en-us/magazine/ee336122.aspx.
When deploying to the Azure cloud make sure to check deployment warnings/errors to see for any breaking issues. Some common errors are
- Remote desktop is enabled but the remote desktop certificate has not been uploaded to the portal
- https is not chosen for diagnostics connection string
- If deploying the sample MvcMovie application, you can safely ignore the warning that indicates you are only running 1 instance of it.