Angular2环境搭建
发布于 2017-03-23 22:47:54 | 503 次阅读 | 评论: 0 | 来源: PHPERZ
AngularJS 前端JS框架
AngularJS诞生于Google是一款优秀的前端JS框架,已经被用于Google的多款产品当中。AngularJS有着诸多特性,最为核心的是:MVC、模块化、自动化双向数据绑定、语义化标签、依赖注入,等等。
1.创建package.json文件
cd xhhAngular

npm init
package.json:
{
  "name": "xhhangular",
  "version": "1.0.0",
  "description": "",
  "scripts": {
    "start": "webpack-dev-server --inline --hot --colors --progress",
    "postinstall": "./node_modules/.bin/typings install"
  },
  "author": "xhh",
  "license": "ISC",
  "dependencies": {
    "@angular/common": "~2.1.0",
    "@angular/compiler": "~2.1.0",
    "@angular/core": "~2.1.0",
    "@angular/forms": "~2.1.0",
    "@angular/http": "~2.1.0",
    "@angular/platform-browser": "~2.1.0",
    "@angular/platform-browser-dynamic": "~2.1.0",
    "@angular/router": "~3.1.0",
    "@angular/upgrade": "~2.1.0",
    "angular-in-memory-web-api": "~0.1.5",
    "bootstrap": "^3.3.7",
    "core-js": "^2.4.1",
    "reflect-metadata": "^0.1.8",
    "rxjs": "5.0.0-beta.12",
    "zone.js": "^0.6.25"
  },
  "devDependencies": {
    "html-webpack-plugin": "^2.28.0",
    "path": "^0.12.7",
    "ts-loader": "^0.8.2",
    "typescript": "^2.0.3",
    "typings": "^1.4.0",
    "webpack": "^1.13.2",
    "webpack-dev-server": "^1.16.1"
  }
}
2.创建tsconfig.json
{
  "compilerOptions": {
    "target": "es5",
    "module": "commonjs",
    "moduleResolution": "node",
    "sourceMap": true,
    "emitDecoratorMetadata": true,
    "experimentalDecorators": true,
    "removeComments": true,
    "noImplicitAny": true,
    "declaration": false
  }
}
3.创建typings.json
{
  "globalDependencies": {
    "es6-shim": "registry:dt/es6-shim#0.31.2+20160602141504"
  }
}
现在运行 npm install 安装 package.json 里所有的依赖包:
npm install --registry=https://registry.npm.taobao.org/
4.创建app.module.ts
import 'zone.js/dist/zone';
import 'reflect-metadata';

import { NgModule }      from '@angular/core';
import { BrowserModule } from '@angular/platform-browser';

import {AppComponent} from './app.component';

// components, directives and pipes — belong in the declarations array.
@NgModule({
  imports:      [ BrowserModule ],
  declarations: [ AppComponent ],
  bootstrap:    [ AppComponent ]
})

export class AppModule { }
5.创建app.component.ts
import { Component } from '@angular/core';

// 为 AppComponent 组件类添加注解
@Component({
  selector: 'my-app',
  template: '<h1>Hello {{title}}</h1><input type="text" #userRef (keyup)="onKeyup1(userRef.value)">',
  styles:['h1{color:red}']
})

export class AppComponent {
     title='World';
     onKeyup1(userInput:string){
        //这是typescript的写法,定义你的参数为string类型,并在调用的时候做检查
        this.title=userInput;
     }
}
6.创建main.ts
// 引入启动器
import { platformBrowserDynamic } from '@angular/platform-browser-dynamic';

// 引入入口文件
import { AppModule } from './app.module';

// 启动应用
const platform = platformBrowserDynamic();
platform.bootstrapModule(AppModule);
7.创建主页面index.html
<!DOCTYPE html>
<html lang="en">
<head>
    <meta charset="UTF-8">
    <meta name="viewport" content="width=device-width, initial-scale=1">
    <title>Angular2 QuickStart</title>
</head>
<body>
    <!-- 对应 @Component({ selector: 'my-app', ... }) -->
    <my-app></my-app>

    <!-- 编译打包后的文件 -->
    <script src="dist/bundle.js"></script>
</body>
</html>
8.创建webpack.config.js
var path = require('path');
var webpack = require('webpack');

module.exports = {
    entry: {
        main: './src/main.ts'
    },
    output: {
        path: path.resolve(__dirname, 'dist'),
        publicPath: '/dist/',
        filename: 'bundle.js'
    },
    devtool: 'cheap-module-eval-source-map',
    module: {
        loaders: [
            {
                test: /\.ts$/,
                loader: 'ts'
            }
        ]
    },
    // require 文件时可省略后缀 .js 和 .ts
    resolve: {
        extensions: ['', '.js', '.ts']
    },
    // 配置 webpack-dev-server
    devServer:{
        historyApiFallback: true,
        hot: true,
        inline: true,
        port: 3000 // 修改端口,一般默认是8080
    },
    plugins: [
        new webpack.optimize.UglifyJsPlugin({minimize: true})
    ]
};
然后运行项目: npm start
访问localhost:3000即可。
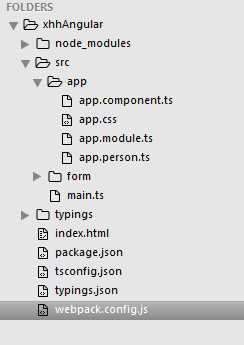
附文件目录:
推荐阅读
最新资讯
