在 Docker 中完整部署 Web 应用
发布于 2016-01-04 09:38:12 | 592 次阅读 | 评论: 0 | 来源: PHPERZ
Docker 开源应用容器引擎
Docker 是一个开源的应用容器引擎,让开发者可以打包他们的应用以及依赖包到一个可移植的容器中,然后发布到任何流行的 Linux 机器上,也可以实现虚拟化。
一个完整的 Web 应用包含前端页面、数据库、后台逻辑等,按照一般流程去构建需要配置 Nginx、MySQL,以及后台服务器,运维涉及到的部分十分复杂。而 Docker 可以将这些东西(数据+服务)封装起来,虽然有些场合不建议数据和服务放在一起。本文就在一个 Docker 容器中完整部署整个 Web 应用的需求作详细的介绍。
本文举例的 Web 应用为 「top-topic-Zhihu」(换个 timeline 看知乎),整个项目可以在 Github 中找到。
Dockerfile 和依赖文件托管在 docker-toptopic,云服务商选择「灵雀云」提供容器服务。
在「灵雀云」服务提供的域名 http://toptopic-huangtuzhi.myalauda.cn:19991/ 可以看到本网站。
文件目录
整个 Web 应用的目录结构如下所示:
├── docker-toptopic
│   ├── Dockerfile
│   ├── init.sh        # 启动 Nginx MySQL 和后台 Server 的初始化脚本
│   ├── mysql          # MySQL 配置文件
│   │   └── my.cnf
│   ├── nginx          # Nginx 配置文件
│   │   ├── global.conf
│   │   └── nginx.conf
│   ├── question.txt   # 需要导入到 DB 的数据
│   ├── README.md
│   └── web
│       ├── dataAccess.py # 后台 Server 的 AO 服务
│       ├── dataCGI.py    # 后台 Server
│       └── www           # 网站
│           ├── assets
│           │   ├── tuzhii.ico
│           │   └── tuzhii.jpg
│           ├── css
│           │   ├── button.css
│           │   └── toptopic.css
│           ├── index.html
│           └── js
│               └── template.js
Dockerfile
Dockerfile 描述了容器的依赖和进行构建的步骤,下面会逐步解释语句的含义。
FROM ubuntu
MAINTAINER titushuang "ituzhi@163.com"
ENV REFRESHED_AT 2015-10-12

RUN apt-get update \
    && apt-get install -y mysql-server-5.6 python  python-dev python-pip libmysqlclient-dev nginx

RUN pip install MySQL-python flask
RUN pip install -U flask-cors

RUN mkdir -p /home/toptopic /home/toptopic/web

COPY init.sh /home/toptopic/init.sh
COPY web /home/toptopic/web
COPY question.txt /home/toptopic/question.txt

COPY nginx/global.conf /etc/nginx/conf.d/
COPY nginx/nginx.conf /etc/nginx/nginx.conf
COPY mysql/my.cnf /etc/mysql/my.cnf

RUN ln -s /home/toptopic/web/www /usr/share/nginx/html

RUN chmod +x /home/toptopic/init.sh
RUN chmod -R 755 /home/toptopic/web

RUN ./etc/init.d/mysql start &&\
    mysql -e "grant all privileges on *.* to 'root'@'%' identified by 'dbpasswd';"&&\
    mysql -e "grant all privileges on *.* to 'root'@'127.0.0.1' identified by 'dbpasswd';"&&\
    mysql -e "CREATE DATABASE top_topic_zhihu; use top_topic_zhihu;"&&\
    mysql -e "CREATE TABLE top_topic_zhihu.question(question_id varchar(30) NOT NULL, \
    title varchar(200), ask_time datetime,followers int)"&&\
    mysql -e "load data infile '/home/toptopic/question.txt' into \
    table top_topic_zhihu.question fields terminated by ';;'"&&\
    mysql -e "grant all privileges on *.* to 'root'@'localhost'\
     identified by 'dbpasswd';"

EXPOSE 2223 5000

CMD ["/home/toptopic/init.sh"]
MySQL 安装和配置
MySQL 服务器只需要用包管理器安装 mysql-server-5.6,因为后台使用 Python 作为服务器语言,还需要安装 MySQL 对 Python 语言的支持。需要使用 apt 安装 python ,libmysqlclient-dev 和 python-dev,然后使用 pip 管理器安装 MySQL-python。
MySQL 的默认字符集为 latin1,而网页显示一般是 utf8 字符集,需要将 MySQL 的配置文件的字符集置为 utf8。
使用命令
COPY mysql/my.cnf /etc/mysql/my.cnf
将本地已修改好的配置文件覆盖 Docker 中的 MySQL 配置文件。查看字符集
mysql> SHOW VARIABLES LIKE 'character_set_%';
+--------------------------+----------------------------+
| Variable_name            | Value                      |
+--------------------------+----------------------------+
| character_set_client     | utf8                       |
| character_set_connection | utf8                       |
| character_set_database   | utf8                       |
| character_set_filesystem | binary                     |
| character_set_results    | utf8                       |
| character_set_server     | utf8                       |
| character_set_system     | utf8                       |
| character_sets_dir       | /usr/share/mysql/charsets/ |
+--------------------------+----------------------------+
8 rows in set (0.00 sec)
若字符集如上所示,则说明已经修改成功。
MySQL的坑
在上面的 Dockerfile 中看到分别给 'root'@'127.0.0.1' 和 'root'@'localhost' 都加了权限, 'root'@'localhost' 的权限在 SQL 语句最后才加上。这是因为
- 使用
'root'@'localhost'没权限建数据库和表,报错
Access denied for user 'root'@'localhost' (using password: No)
- 使用
'root'@'127.0.0.1'进入 Docker 后没权限连接 Mysql,报错
Access denied for user 'root'@'localhost' (using password: YES)
于是这里用 'root'@'127.0.0.1' 来建数据库和表,最后再用 'root'@'localhost' 来连接数据库。
Nginx 安装和配置
Nginx 在这里作为静态页面的服务器,安装只需要用 apt 管理器安装即可。
Nginx 需要配置 root 目录来指定网站的文件位置,把本地的 global.conf 和 nginx.conf 文件覆盖到 Docker 中。
COPY nginx/global.conf /etc/nginx/conf.d/
COPY nginx/nginx.conf /etc/nginx/nginx.conf
在 global.conf 中我们指明服务器根目录为 /usr/share/nginx/html/www
server {
        listen          0.0.0.0:2223;
        server_name     _;

        root            /usr/share/nginx/html/www;
        index           index.html index.htm;
        }
在 Docker 中,我们将网站文件放到新建的 /home/toptopic/web/www目录。这里建立一个软链接将它们关联起来,便于修改和维护。
RUN ln -s /home/toptopic/web/www /usr/share/nginx/html
EXPOSE 两个端口
EXPOSE 在 Docker 中用来限制开放的端口。我们使用 Nginx 来提供静态页面访问,使用 Flask 框架来提供动态页面数据的获取,所以需要开放两个端口。
EXPOSE 2223 5000
查询端口状态,可以看到宿主机 2333 端口被映射到 Docker 的 2333 端口,宿主机 5000 端口被映射到 Docker 的 5000 端口。
hy@HP /tmp $ sudo docker ps
[sudo] password for huangyi:
CONTAINER ID      IMAGE                COMMAND
CREATED           STATUS               PORTS         NAMES
2d1d03d08a95        titus/mysql:latest   /bin/bash
9 seconds ago      Up 9 seconds   0.0.0.0:2223->2223/tcp,0.0.0.0:5000->5000/tcp   clever_hoover
2223 端口与上节中的 Nginx 中设定的端口必须保持一致,因为 Nginx 使用 2223 端口提供服务,Docker 刚好必须把这个端口开放出去。
在基于 Flask 框架写的后台服务 dataCGI.py 中,服务器对应的监听地址为
app.run(host='0.0.0.0', port=5000, debug=True, threaded=True)
host 必须设置为 0.0.0.0,表示监听所有的 IP 地址。如果 host 使用 127.0.0.1,在容器外将无法访问服务。同时,这里的端口 5000 和 Dockerfile 中开放的另一个端口一致。
启动脚本
在 Dockerfile 中的 CMD 中可以指定 Docker 运行时执行一些命令。
/etc/init.d/mysql start
/etc/init.d/nginx start &
/home/toptopic/web/dataCGI.py
这三行分别启动 MySQL,Nginx 和后台服务。
构建命令
构建 Docker 容器
sudo docker build -t="titus/toptopic" .
运行容器
sudo docker run -t -i -p 2223:2223 -p 5000:5000 titus/toptopic
需要注意的是若使用
sudo docker run -t -i -p 2223:2223 -p 5000:5000 titus/toptopic /bin/bash
无法启动 CMD 中的脚本命令,这是因为在 docker run 后指定了 /bin/bash 后会覆盖 CMD 中的命令。
在云平台上部署
在「灵雀云」上部署一个 Docker 应用需要两步:构建——创建服务。

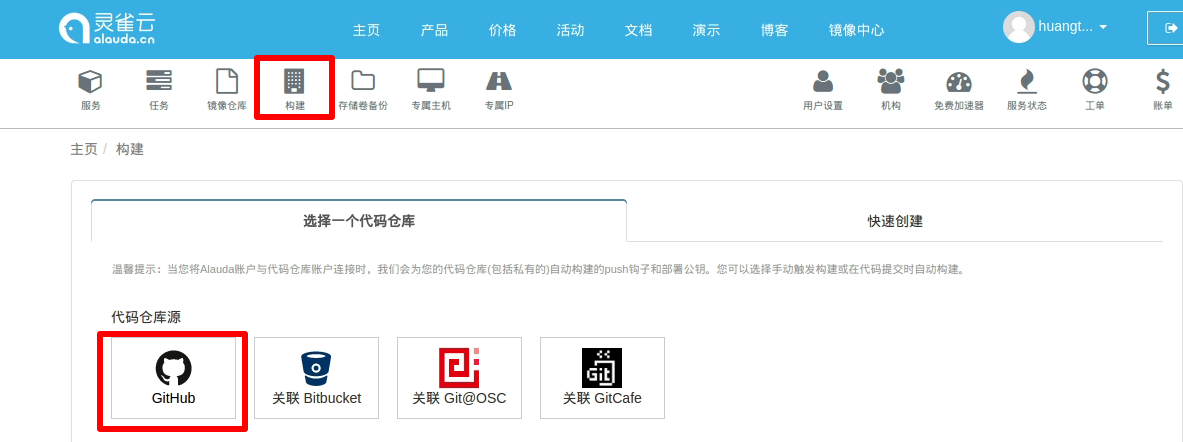
点击「构建」——「创建镜像构建仓库」,然后选择 Github 仓库源。需要把预先写好的 Dockerfile 放在 Github中。

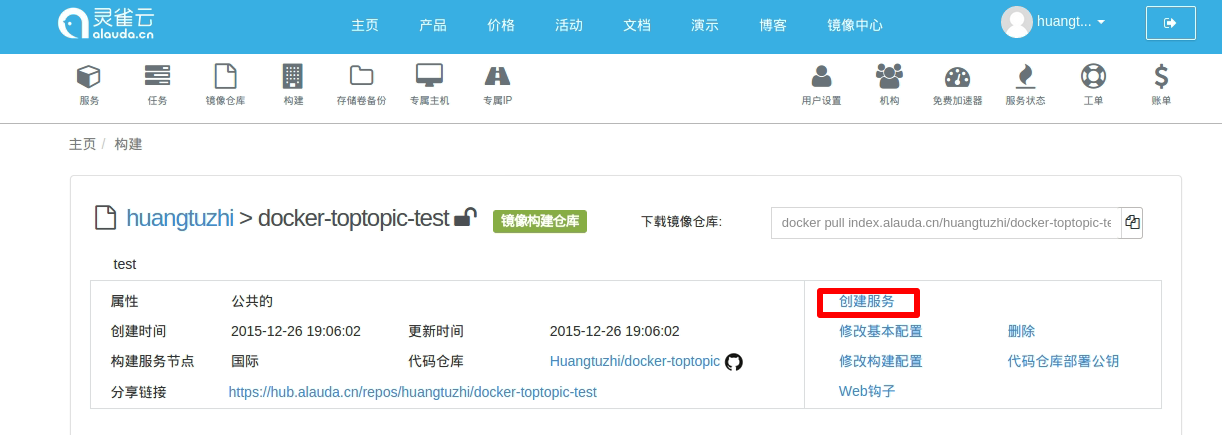
构建好仓库之后,点击「创建服务」。

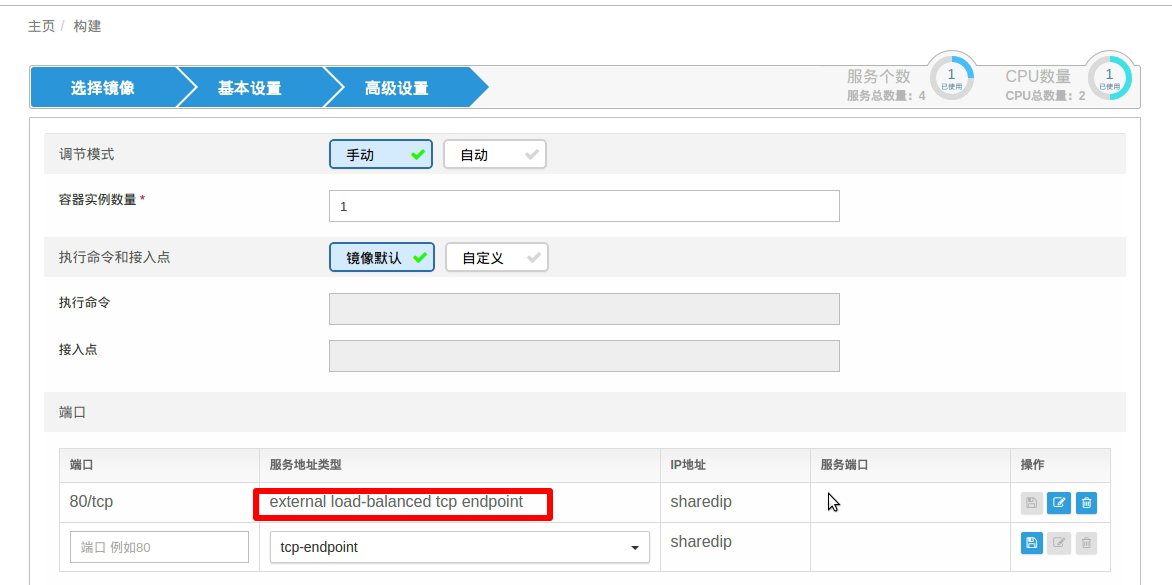
进行服务的设置,高级设置中服务地址类型选为 tcp-endpoint 即可(外部用户可以直接通过 TCP 方式访问这个服务地址,服务地址的端口是随机分配的,一般会大于 10000 小于 65535)
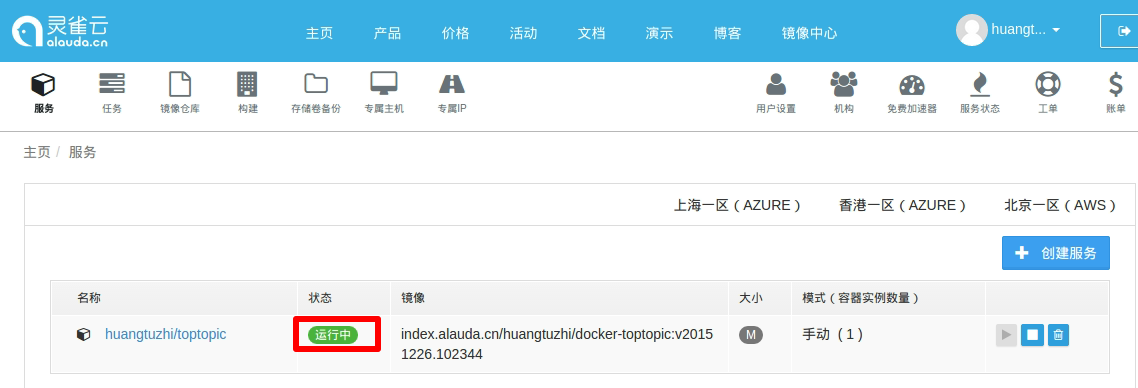
最后点击最下方的「创建服务」完成部署。新建的服务如下所示:

在浏览器中输入http://toptopic-huangtuzhi.myalauda.cn:19991/ 即可访问网站。